Earlier this year (Jan. 2014) I went to Tromsø, Norway to chase the aurora borealis (aka Northern Lights). Planning a trip like this involved a lot of researching, months of reading, but this was really good as I felt very well prepared when I got there.
I decided to write this post in an attempt to summarize here the most important things you need to know in my opinion if you are planning to go up there in the Arctic to see the Aurora and also want to photograph it.
The Aurora starts on the Sun.
The sun acts like an enormous power plant and the energy is created deep inside it’s core, where the temperature is over 14 million degrees C and the pressure is so enormous that hydrogen atoms are squeezed together into another element: Helium. This nuclear fusion releases energy.
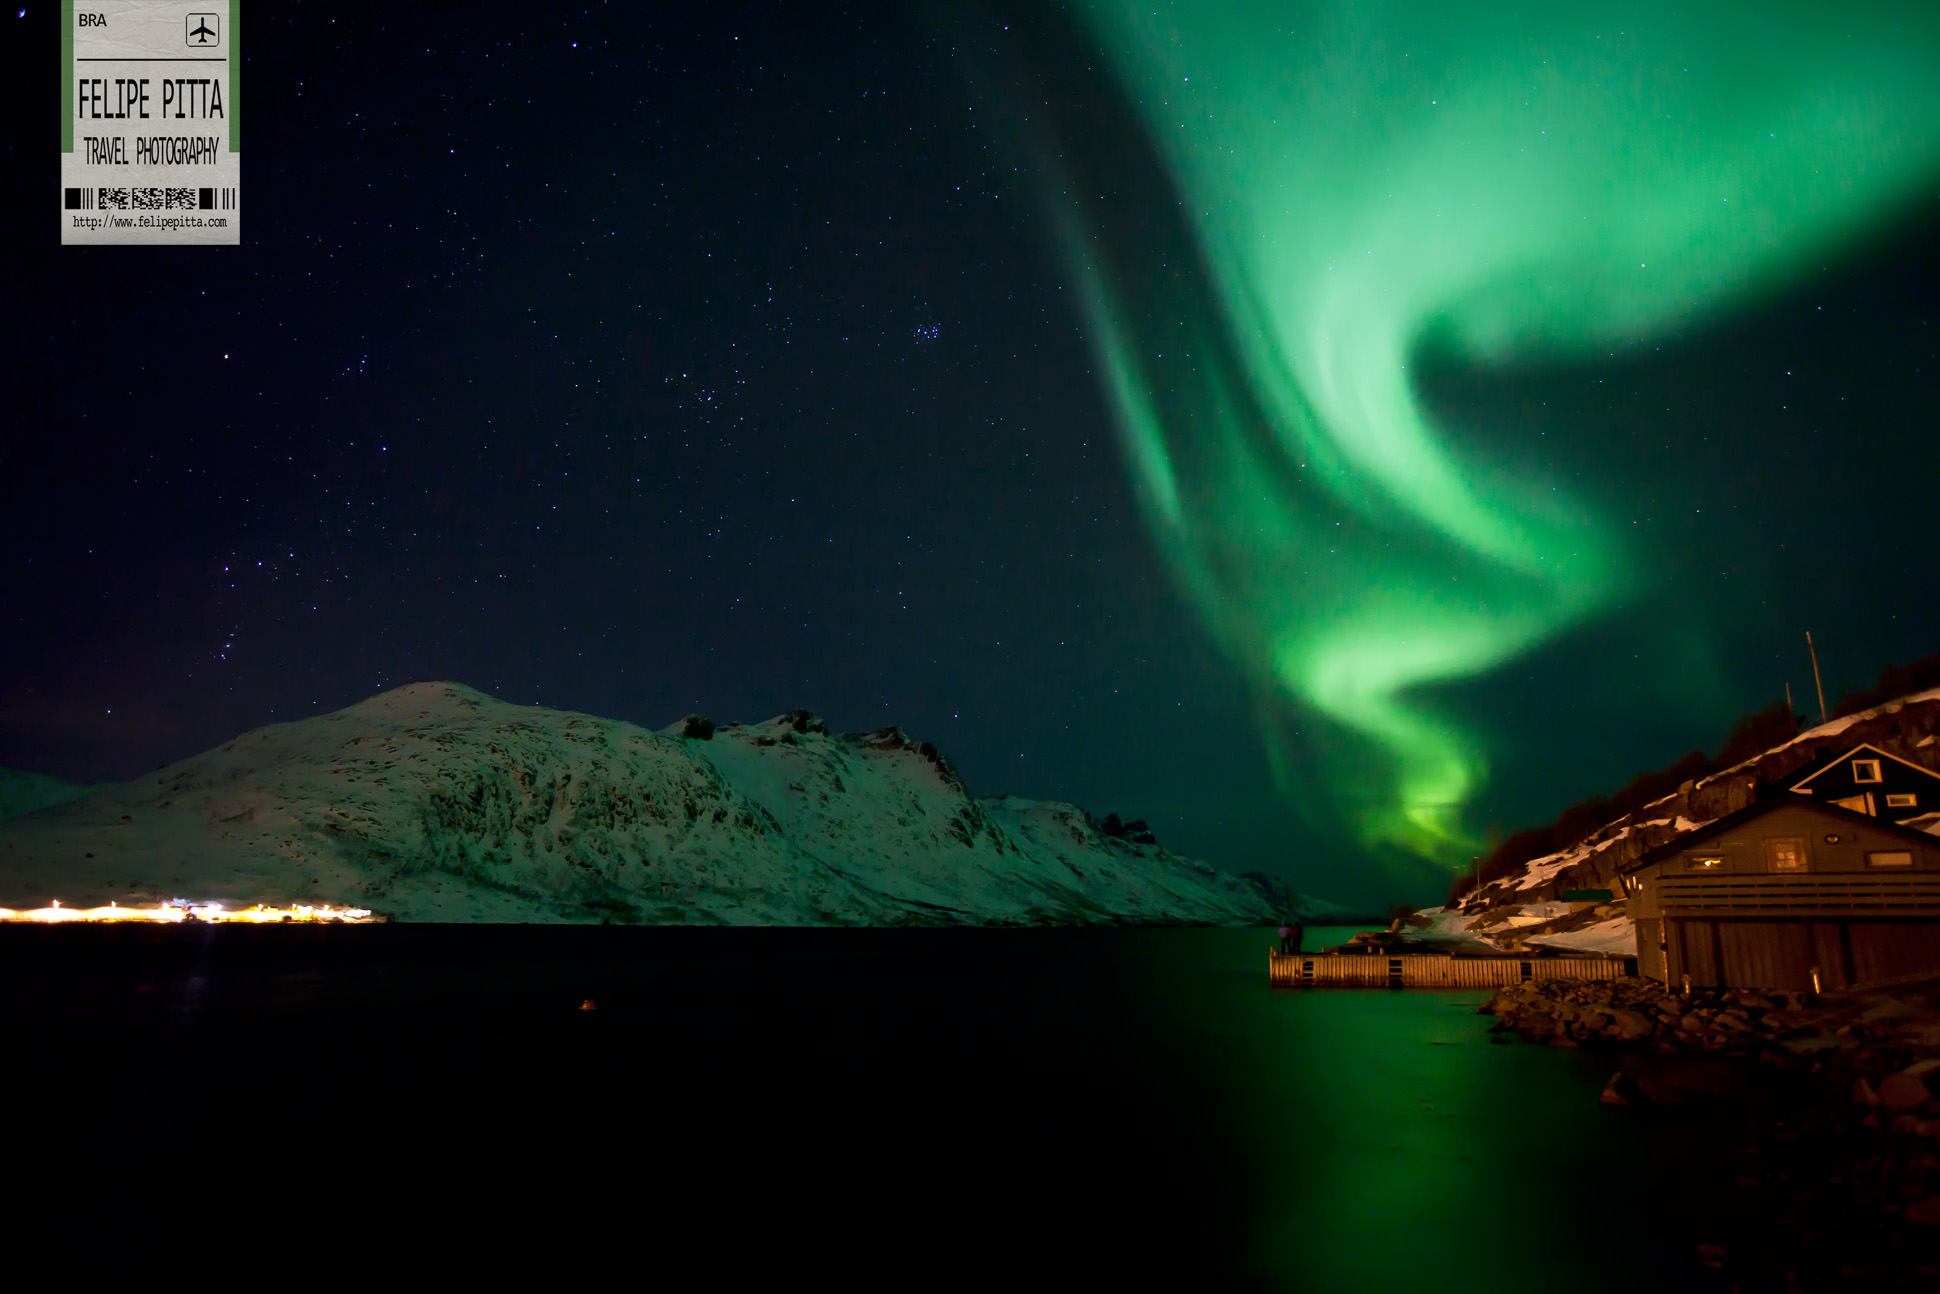
The energy radiates outward from the Sun’s core. This electrically charged gas, also called plasma, creates magnetic fields inside the Sun. In some places, strong magnetic fields pushes their way up through the surface. The surface cools and darker sun spots appear.
The plasma drags the magnetic field further outwards. The magnetic field stretches and twists like a rubber band, and then, the rubber band breaks. Several billion tons of plasma is hurled out from the Sun, this is called a solar storm.
The beginning of a solar storm
The solar storm can reach speeds over 8 million km/h. After 6 hours it blows past the planet Mercury, after 12 hours the planet Venus and after 18 hours the solar storm reaches Earth.
When the solar storm reaches our planet something strange happens: an invisible shield, the Earth’s magnetic field, deflects the storm. The magnetic fields couple together and create a funnel where the gas streams down on the daylight side of the pole. This is the daylight Aurora.
The magnetic fields stretch further back and couple together. The magnetic rubber band breaks and gas from the solar storm streams along the magnetic lines towards the poles on the night side. This is the nighttime Aurora.
So when you see the Auroras dancing, you’re actually seeing our magnetic field lines flowing illuminated :-)

When the solar storm reaches our planet, Earth’s magnetic field deflects the storm to the poles
The Aurora ovals are actually not exactly in the poles, it is like a ring that it’s slightly away.
So if you are in the Northern Hemisphere it’s around 65 to 75 degrees latitude and the best places to see the aurora borealis (or northern lights) would be Alaska, Northern Canada, Iceland, Northern Norway, Northern Sweden or Northern Finland. If the Aurora is really strong the ring gets bigger and goes down to more southern latitudes, unfortunately this is not that common.
In the Southern Hemisphere it’s a little bit harder since there’s not much land around that latitude. The aurora australis (or the southern lights) can be seen from high southern latitudes in Antarctica, South America, New Zealand, and Australia.

Aurora Oval in the Northern Hemisphere (left) and Southern Hemisphere (right)
WHEN IS THE BEST TIME TO SEE THE AURORA – AURORA FORECAST?
There are a lot of things that influence the Aurora’s display. Here I try to list the main ones:
- the Solar Cycle: is the periodic change in the Sun’s activity – changes in the levels of solar radiation and ejection of solar material, number of sunspots, flares, etc). It has an average duration of about 11 years.
Ideally the best time to see the Aurora is when the solar cycle is on its peak, and according to NASA, this is happening right now (2014). So the best bet would be to take a look at the northern lights in this year or the next, otherwise you might have to wait for the next cycle… You can still get to see the Aurora in the bottom of this cycle, they will just not be as frequent and/or as strong.
- Equinoxes: the times around the equinoxes (a week before/after 20 March and 22 September) are when geomagnetic storms – disturbances in the Earth’s magnetic field – are strongest. The good thing about it is that this period is not too cold, as it is a bit outside of the stronger winter months.
- Full Moon: a full moon has absolutely no effect on either solar storms or geomagnetic storms. Still, a full moon casts a lot of light in the sky, and, while a strong auroral display might not be drowned in bright moonlight, a weak auroral display might be affected. The best thing to do is to check the moon phases calendar and avoid the full moon.
- Kp Index: the Kp index measures the strength of the Aurora in a scale from 0 to 9, but normally you will see it in a 0 to 2 range and occasionally 4 to 5. The higher this number further south the auroral ring will radiate, the better the Aurora is. Soft Server News gives you 60min Kp Index forecast and much more useful info.
Below we can have an idea of how far from the Arctic the Aurora can be seen in North America and Europe/Asia according to the Kp index:
Kp Index Range | North America (left) – Europe/Asia (right)
- Coronal Mass Ejection (CME): is a huge amount of matter and electromagnetic radiation blasted from the Sun into space. If that comes to Earth it usually means strong Auroras. Spaceweather.com gives you updated info about CMEs heading towards Earth’s magnetic field.
- Coronal Holes: are areas in the upper atmosphere of the Sun (corona) that are darker, colder, and have lower-density plasma than average. This allows fast moving solar winds underneath to escape out into space, which can also cause strong Auroras if the solar wind flowing from it reaches Earth. During solar minimum, coronal holes are mainly found at the Sun’s polar regions, but they can be located anywhere on the Sun during solar maximum.
- Solar wind speed: it is usually bellow 400km/sec, but if it goes higher than that it can also indicate a good Auroral display.
- Interplanetary Magnetic Field: in short, the Auroras will be stronger when the Bz value is pointing south.
Coronal Holes (left) | Coronal Mass Ejection (CME) (right)
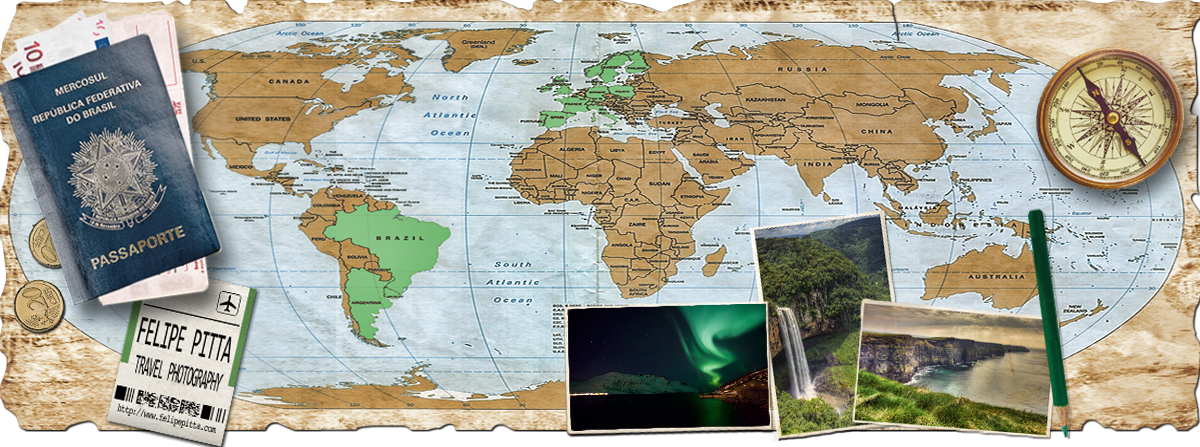
Northern Lights at Ersfjordbotn | Tromsø, Norway
PHOTO GEAR
Unfortunately not all the cameras are capable of capturing the Aurora. Cameras that run only in automatic or semi-automatic modes more likely won’t to a good job. Here are few tips about the ideal photo gear:
- Camera: you will need a camera that allows you to change settings manually. The ISO, f-stop and exposure time will have to be set according to the Auroras’ strength and, of course, your personal preference. Start with a 1600 ISO and adjust from there. Shoot in RAW so that you can reduce the noise and other few adjustments when post-processing the images. The Av mode (aperture priority) was the one that worked best for me during the trip.
- Lens: a bright and wide angle lens is great so you can get a nice wide view. A low f-stop number (f/1.4, f/2.8, even f/4) allows more light into the camera and therefore reduces the exposure time and/or ISO, however these lenses tend to be a bit expensive. If you can’t get a bright lens it’s ok, but it means you will need a higher ISO and exposure time.
- Focus: always set to infinity. It’s more likely that you won’t be able to use automatic focus if you are in a very dark place. The best option would be to focus on something very far away (infinity) and then change your settings to manual focus before leaving the city. Alternatively you can manually set the focus to infinity yourself, the problem is that the infinity position marker is not very reliable in many lenses, therefore it’s better to test yours beforehand.
- Tripod/Ballhead: A tripod is absolutely essential for northern lights photography. A tall tripod will be more comfortable, as you will be aiming the camera up towards the sky. Keep it sturdy on a windy night by removing the strap off the camera and/or weighing it down with a bag of rocks or your backpack. A tripod with leg warmers to protect your hands from cold metal is also worthy.
- Batteries: at very low temperatures all batteries lose power, so bring spare batteries with you and keep them close to your body, for example, in a shirt pocket where they will also benefit from your body heat.
- Memory Cards: bring spare memory cards with you, specially if you plan to shoot time lapse in RAW. Better have too much memory cards than have to stop shooting :-)
- Headlamp: A headlamp allows two hands to be free while handling your camera, tripod, etc… Get one with a red light to maintain your night vision (white flash lights are not good for that), nearby photographers will also be happy. Also, consider the on-off switch before purchasing, as you will be operating the headlamp with gloves on.
- Intervalometer (optional): prevents camera shake and allows for exposures in excess of 30 seconds, you can also use it for time lapse. Alternatively use the timer of the camera.
It worth mention here about condensation in your gear – the same happens with a cold water bottle in a hot summer day. When you bring your camera and lenses from a very cold place to inside the car/hotel the moisture can damage the mechanical/electrical internal parts. To avoid that, place your camera inside one of those sealed plastic bags before going back to a warmer place. The moisture will settle on the outside of the bag rather than on the camera’s outside and inside surfaces.
Northern Lights at Ersfjordbotn | Tromsø, Norway
I found Spaceweather.com and Soft Server News the best places to find these and other useful data you need before heading outside to chase the lights. Unfortunately, they only give us 1 to 2 days forecast, which might not be enough for those who don’t live in higher latitudes. If that is the case, then you will have to take a chance and book a trip. Maximize your chances by staying at least 1 week in the place you choose, so that you have few nights to try whether you get cloudy skies, weak or strong Auroras, etc..
If you don’t have a private guide then it’s definitely important to get to know/understand the city and locations before going (Google Maps and Street View are your best friends). If you are driving, check if there’s another city nearby that you can go to runaway from cloudy skies and bad weather. If you plan to take photos with a nice landscape in the foreground/background (mountain, water, etc) try to scout the location during the day as you won’t have a clear view of the location at night. And remember: get away from the city lights!!!
The Aurora can come and go. It can come for 10 seconds, die down, and come back after 1 hour or few minutes with an amazing show that is completely different from the previous one. So be patient when you are outside in the cold, I’m sure you’ll be paid out. Remember to bring a flask of coffee, tea or hot-chocolate with you – take it and you will see :-)
I’m really happy to share these few things I learned while planning my trip and I hope that they will be useful helping more people to see/capture this fantastic phenomenon. If you think so, please feel free to share this post!


by Felipe Pitta
Felipe, thanks a lot for this!! I’m definitely going to save it for my trip to Alaska in September! Hope I can see the Aurora this time.
Good luck John! Hope you can experience this amazing phenomenon.
I put an entire science into spotting and photographing the phenomenon. Inspirational, thank you :)